Barcode scanning is a powerful tool for managing your inventory, orders, and customer information efficiently. In this article, we’ll explore the types of barcodes you can scan, the tools available for scanning, and their practical use cases within the app.
Barcode scanning is a powerful tool for managing your inventory, orders, and customer information efficiently. In this article, we’ll explore the types of barcodes you can scan, the tools available for scanning, and their practical use cases within the app.
Types of Barcodes
There are two types of barcodes supported in the app and the Online Portal:
Item Barcodes
Scan an item barcode to:
Add items to invoices,
Update your inventory, or
Search for items in your inventory.
Note: If you generate QR codes for your inventory on your own, scanning those will work too!
Customer Label Barcodes
Scan and quickly search for a customer to:
Assign to an order/invoice, or
View or edit their contact information.
To print a customer label:
Navigate to Customers in your Online Portal.
Select a customer to view their details.
Here, you will see the customer barcode label with a Print Label button.
Barcode Scanning Methods
You can scan barcodes using one of the following methods:
Built-in camera on your device
Scan item barcodes using your phone or tablet’s camera to:
Add items to an invoice, or
Add items to a wholesale order when receiving.
SEE HERE for instructions on how to use your built-in camera to scan items.
Note: Your device’s camera only allows you to scan item barcodes.
Bluetooth barcode scanning device
Use a barcode scanning device for faster and more efficient scanning when:
Adding items to an invoice
Adding items to a wholesale order when receiving inventory
We recommend the following barcode scanning devices. Below are the steps to connect each to your mobile or desktop device:
Sumicor 2D Wireless Bluetooth Barcode Scanner
Eyoyo Mini 1D Bluetooth Barcode Scanner
SEE HERE for setup instructions. SEE HERE for instructions on how to use a bluetooth scanning device.
How Barcode Scanning is Used
Inventory Item Barcodes
Using barcodes for inventory items allows you to streamline the following processes:
Adding Items to an Invoice (mobile and desktop)
Adding Items to a Wholesale Order (device camera only / mobile only)
Adding Items to Inventory (mobile only)
Searching for Items in Inventory (mobile and desktop)
Customer Label Barcodes(desktop only)
Scanning a customer label barcode allows you to:
Quickly access and manage customer information.
Tap into the search field on the Customers screen and scan a PRINTED barcode to find their contact details instantly.
Review order history.
Edit customer information.
Assign a customer to an order/invoice.
Scan a customer label to select a customer when creating a new order.
To print a customer label:
Navigate to Customers in your Online Portal.
Select a customer to view their details.
Here, you will see the customer barcode label with a Print Label button.
Built-in Camera Scanning Guide
Adding an Item:
Add new items to an Invoice
Add new items to your Inventory:
Add items to a Wholesale Order:
Step 1: Go to Orders from the main menu
Step 2: Tap on the “+” button to start a new order.
Step 3: Tap the barcode icon (), which will allow you to:
Scan a barcode to add it to the order, or
Select manually enter barcode and time in an item SKU to add it to the order (mobile only at this time).
Tip: Select the Continuous Scan option at the bottom of the camera screen to speed up the process of scanning multiple items. As you scan each item, a pop-up will display the quantity and price, while a running total of all scanned items will appear in the footer. Use the back button to review and finalize your order details.
iOS
Note: If the item already exists in your inventory, the app will recognize this and add that item to the order. If the item does not exist in your inventory, the app will add the item to the order during this step – this is why you don’t have to worry about uploading inventory before making in-person sales!
Adding an item on the fly to an order ONLY adds it to the invoice. This does NOT add the item to your inventory. Meaning, if an invoice is canceled or expired, the item will not be added “back” into your inventory.
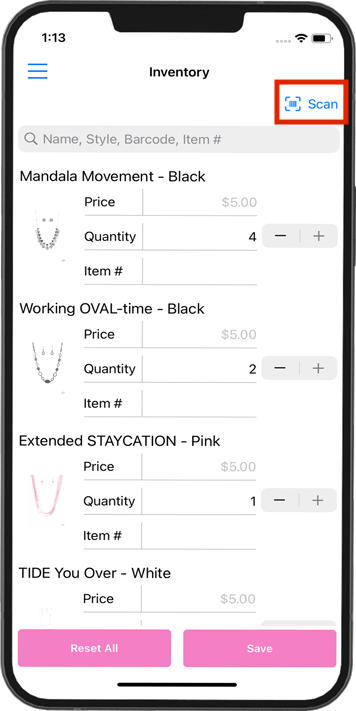
Step 1: Go to Inventory from the main menu.
Step 2: Tap on the barcode icon ()on the upper right corner of the screen.
The camera on your device will open to scan your barcodes.
The barcode will be scanned and if found, the item will display on screen.
The item will be added to your Inventory.
💡 Tip: A flashlight button may be selected when the Scanner has been opened. This can help to scan troublesome barcodes or improve the lighting in the space.
iOS
iOS
Android
Step 1: Go to the Receiving from the main menu.
Step 2: Select an Open Wholesale Order.
Step 3: Click the Scanner button ().
The camera on your device will open to scan your barcodes.
Step 4: Frame the barcode within the square on the screen.
The barcode will be scanned and if found, the item will display on screen.
The item will be added to the selected Wholesale Order.
Searching an Item:
You can use the Scanner feature to quickly find specific items in Inventory and New Orders.
Step 1: Go to Inventory from the navigation pane.
Step 2: Click the Scanner button.
The camera on your device will open to scan your barcodes or QR codes.
Step 3: Frame the barcode or QR code within the square on the screen.
The barcode or QR code will be scanned and if found, the item will display on screen.
Guide to Bluetooth Scanning
Again, we recommend the following barcode scanning devices. Below are the steps to connect each to your mobile or desktop device:
Sumicor 2D Wireless Bluetooth Barcode Scanner
Eyoyo Mini 1D Bluetooth Barcode Scanner
Connecting a Barcode Scanner
1. Sumicor 2D Wireless Bluetooth Barcode Scanner
Wired Mode
Connect the scanner to your computer using the USB cable provided.
The cable also functions as a charger.
Wireless Connection (USB Dongle)
Scan the setup codes provided in the user manual.
Plug the USB Dongle Receiver into your computer.
Bluetooth Mode
Scan the setup codes for HID mode pairing (found in the user manual).
Look for “BarCode Bluetooth HID” in your device’s Bluetooth settings and connect.
2. Eyoyo Mini 1D Bluetooth Barcode Scanner
Note: The Eyoyo scanner can connect to Android, iPhone, or tablets via Bluetooth, as well as desktop devices via Bluetooth or USB. It is not compatible with Chromebooks and can only connect to one device at a time.
Wired Mode
Connect the scanner to your computer using the USB cable provided.
The cable also functions as a charger.
Wireless Connection (USB Dongle)
Scan the QR codes for “2.4G Wireless Pairing Mode” and “Match the Receiver” (found on page 20 of the manual).
Plug the USB Dongle Receiver into your computer.
Bluetooth Connection
Long press the scan button for 8–10 seconds or scan the provided code in the manual to set up Bluetooth.
Open Bluetooth settings on your device.
Look for “EY-009 HID” and connect.
Tip:
For iOS users only – Want to speed things up even more? Scan the barcode below to enable the double-click shortcut for switching between your scanner and your keyboard! When this is enabled, all you have to do is double click the button on your scanning device to show or hide the keyboard.
If you want to disable this shortcut, scan the barcode below.
Using a bluetooth barcode scanner:
Add new items to an Invoice
Add new items to your Inventory
Search for a customer:
Mobile:
Step 1: Tap the Scanner button.
Step 2: A scanning field will appear. Use it to scan the item’s barcode.
Step 3: The scanned item will automatically be added to your invoice or order.
Note: Scanning barcodes searches the entire product catalog, while manual searches only look through your inventory.
Desktop:
Step 1: Start a new order.
Step 2: Begin scanning barcodes—items will be added directly to the order.
Mobile:
Step 1: Go to Inventory from the main menu.
Step 2: Tap into the Search Bar.
Step 3: Scan the item’s barcode with your barcode scanning device.
If the barcode matches an item, it will appear on the screen.
Step 4: Enter the following details:
Quantity in the ‘How Many’ field.
An optional Item # (if desired).
Step 5: Tap Save to add the item to your Inventory.
Desktop:
Not yet available.
Mobile & Desktop:
Step 1: Navigate to the Inventory page.
Step 2: Tap into the Search Bar.
Step 3: Scan the customer’s barcode to quickly locate their item.
By leveraging barcode scanning, you can simplify your workflow and save valuable time managing your business operations. For additional support, feel free to explore our Help Center or contact us directly!
We use cookies and similar technologies to enhance your experience, analyze performance, and support marketing and business intelligence. By continuing to browse, you consent to our use of cookies.